Support Universal Links
When you support universal links, iOS 9 users can tap a link to your website and get seamlessly redirected to your installed app without going through Safari. If your app isn’t installed, tapping a link to your website opens your website in Safari.
Here, how to setup your own server, and handle the corresponding links in your app.
Setup Server
You need to having a server running online. To securely associate your iOS app with a server, Apple requires that you make available a configuration file, called apple-app-site-association. This is a JSON file which describes the domain and supported routes.
The apple-app-site-association file needs to be accessible via HTTPS, without any redirects, at https://{domain}/apple-app-site-association.
The file looks like this:
{
"applinks": {
    "apps": [ ],
    "details": [
        {
            "appID": "{app_prefix}.{app_identifier}",
            "paths": [ "/path/to/content", "/path/to/other/*", "NOT /path/to/exclude" ]
        },
        {
            "appID": "TeamID.BundleID2",
            "paths": [ "*" ]
        }
    ]
}
}
NOTE – Don’t append .json to the apple-app-site-association filename.
The keys are as follows:
apps: Should have an empty array as its value, and it must be present. This is how Apple wants it.
details: Is an array of dictionaries, one for each iOS app supported by the website. Each dictionary contains information about the app, the team and bundle IDs.
There are 3 ways to define paths:
Static: The entire supported path is hardcoded to identify a specific link, e.g. /static/terms
Wildcards: A * can be used to match dynamic paths, e.g. /books/* can matches the path to any author’s page. ? inside specific path components, e.g. books/1? can be used to match any books whose ID starts with 1.
Exclusions: Prepending a path with NOT excludes that path from being matched.
The order in which the paths are mentioned in the array is important. Earlier indices have higher priority. Once a path matches, the evaluation stops, and other paths ignored. Each path is case-sensitive.
Supporting Multiple Domains
Each domain supported in the app needs to make available its own apple-app-site-association file. If the content served by each domain is different, then the contents of the file will also change to support the respective paths. Otherwise, the same file can be used, but it needs to be accessible at every supported domain.
Signing the App-Site-Association File
Note: You can skip this part if your server uses HTTPS to serve content and jump to Application Setup guide.
If your app targets iOS 9 and your server uses HTTPS to serve content, you don’t need to sign the file. If not (e.g. when supporting Handoff on iOS 8), it has to be signed using a SSL certificate from a recognized certificate authority.
Note: This is not the certificate provided by Apple to submit your app to the App Store. It should be provided by a third-party, and it’s recommended to use the same certificate you use for your HTTPS server (although it’s not required).
To sign the file, first create and save a simple .txt version of it. Next, in the terminal, run the following command:
cat <unsigned_file>.txt | openssl smime -sign -inkey example.com.key -signer example.com.pem -certfile intermediate.pem -noattr -nodetach -outform DER > apple-app-site-association
This will output the signed file in the current directory. The example.com.key, example.com.pem, and intermediate.pem are the files that would made available to you by your Certifying Authority.
Note: If the file is unsigned, it should have a Content-Type of application/json. Otherwise, it should be application/pkcs7-mime.
Validate your Server with Apple App search validation tool
Test your webpage for iOS 9 Search APIs. Enter a URL and Applebot will crawl your webpage and show how you can optimize for best results
https://search.developer.apple.com/appsearch-validation-tool/
Website Code
The website code can be found gh-pages branch on
https://github.com/vineetchoudhary/iOS-Universal-Links/tree/gh-pages
Setup iOS Application
Application will target iOS 9 and will be using Xcode 7.2 with Objective-C.
Enabling Universal Links
The setup on the app side requires two things:
1. Configuring the app’s entitlement, and enabling universal links.
2. Handling Incoming Links in your AppDelegate.
1. Configuring the app’s entitlement, and enabling universal links.
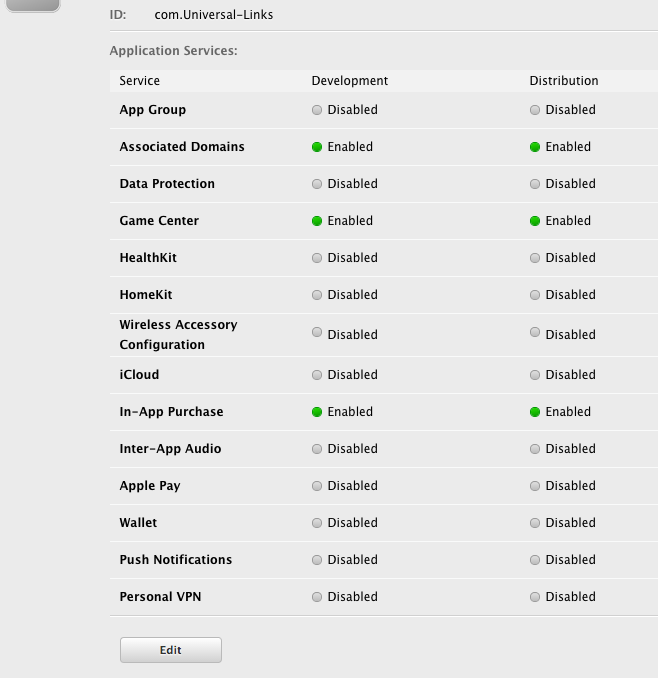
The first step in configuring your app’s entitlements is to enable it for your App ID. Do this in the Apple Developer Member Center. Click on Certificates, Identifiers & Profiles and then Identifiers. Select your App ID (create it first if required), click Edit and enable the Associated Domains entitlement.

Next, get the App ID prefix and suffix by clicking on the respective App ID.
The App ID prefix and suffix should match the one in the apple-app-site-association file.
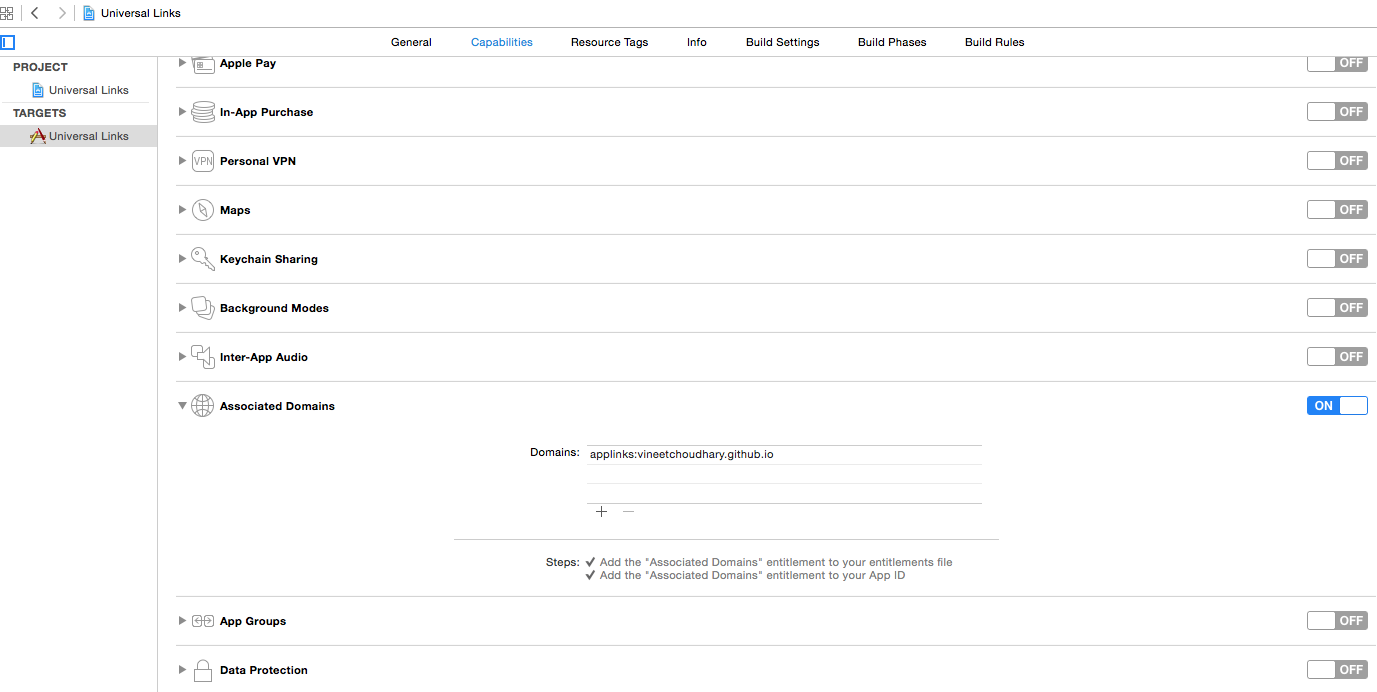
Next in Xcode, select your App’s target, click Capabilities and toggle Associated Domains to On. Add an entry for each domain that your app supports, prefixed with applinks:.
For example: applinks:vineetchoudhary.github.io
Which looks like this for the sample app:

Note: Ensure you have selected the same team and entered the same Bundle ID as the registered App ID on the Member Center. Also ensure that the entitlements file is included by Xcode by selecting the file and in the File Inspector, ensure that your target is checked.

Handling Incoming Links in your AppDelegate
[UIApplicationDelegate application: continueUserActivity: restorationHandler:] method in AppDelegate.m handles incoming links. You parse this URL to determine the right action in the app.
For example, in the sample app:
Objective-C
-(BOOL)application:(UIApplication *)application continueUserActivity:(NSUserActivity *)userActivity restorationHandler:(void (^)(NSArray * _Nullable))restorationHandler{
    if ([userActivity.activityType isEqualToString: NSUserActivityTypeBrowsingWeb]) {
        NSURL *url = userActivity.webpageURL;
        UIStoryboard *storyBoard = [UIStoryboard storyboardWithName:@"Main" bundle:nil];
        UINavigationController *navigationController = (UINavigationController *)_window.rootViewController;
        if ([url.pathComponents containsObject:@"home"]) {
            [navigationController pushViewController:[storyBoard instantiateViewControllerWithIdentifier:@"HomeScreenId"] animated:YES];
        }else if ([url.pathComponents containsObject:@"about"]){
            [navigationController pushViewController:[storyBoard instantiateViewControllerWithIdentifier:@"AboutScreenId"] animated:YES];
        }
    }
    return YES;
}
Swift :
func application(application: UIApplication, continueUserActivity userActivity: NSUserActivity, restorationHandler: ([AnyObject]?) -> Void) -> Bool {
      if userActivity.activityType == NSUserActivityTypeBrowsingWeb {
          let url = userActivity.webpageURL!
          //handle url
      }
      return true
  }
iOS Application Code
The app code can be found master branch on
https://github.com/vineetchoudhary/iOS-Universal-Links/
Note:
- Generally, any supported link clicked in Safari, or in instances of UIWebView/WKWebView should open the app.
- For iOS 9.2 and less, this will only work on a device. iOS 9.3 (still in beta at the time of writing) also supports the simulator.
- iOS remembers the user’s choice when opening Universal Links. If they tap the top-right breadcrumb to open the link in Safari, all further clicks will take them to Safari, and not the app. They can switch back to opening the app by default by choosing Open in the app banner on the website.
Done. It’s all about Universal Links.
References
- Support Universal Links in your iOS App